There’s nothing worse than waking up in the dark to the steady drip of cold water on your sleeping bag—proof that your tent’s defenses have failed. If you’re searching for reliable ways to stay dry outdoors, this guide delivers exactly that. You’ll learn proven tent waterproofing methods, from seam sealing and rainfly treatment to fabric re-coating and field-ready maintenance checks. Every step is drawn from real-world wilderness experience and hands-on gear care, not theory. By the end, you’ll know the precise materials, techniques, and preventative measures needed to protect your shelter and extend its lifespan on every adventure.
The Foundation: Pre-Treatment Cleaning and Inspection
As you ensure your camping gear is in top shape with these tent maintenance tips, don’t forget that having the right footwear can make all the difference in your outdoor adventures—check out our guide on How to Choose the Right Hiking Boots for Any Terrain.
Before you even think about seam sealers or sprays, start with a simple truth: cleaning is non-negotiable. Applying waterproof treatments to a dirty tent is like painting over rust. Dust, body oils, tree sap, and campfire residue block sealants from bonding to fabric fibers, almost guaranteeing premature failure. In other words, even the best tent waterproofing methods won’t stick to grime.
So, what’s the right approach? First, pitch your tent fully—this exposes every panel. Then use cool water, a soft sponge, and a non-detergent soap (technical gear wash is ideal). Regular laundry detergent can strip protective coatings (yes, even the “gentle” kind). Never use a washing machine; agitation can damage seam tape and waterproof layers (REI Expert Advice).
Next, rinse thoroughly. Soap residue attracts moisture, which defeats the purpose. Let the tent air dry completely, avoiding harsh midday sun that can degrade nylon over time.
Finally, inspect carefully. Look for peeling seam tape, flaking interior coatings (called delamination, when layers separate), and tiny pinholes. Catching these early saves bigger repairs later (pro tip: shine a flashlight inside to spot micro-tears).
Your First Line of Defense: How to Perfectly Seal Tent Seams
Seams are the most vulnerable points on any tent. Every stitch creates tiny needle holes—thousands of microscopic doorways where rain can sneak in (and it will, usually at 2 a.m. in the middle of a storm). In damp climates like the Pacific Northwest or during Appalachian shoulder-season treks, poorly sealed seams fail fast.
First, inspect for flaking seam tape. If factory tape is peeling, remove it completely. Gently pull it away and rub off residue with your fingers or a cloth lightly dampened with isopropyl alcohol. Afterward, clean and dry the area thoroughly. Skipping this step might seem harmless, but new sealant won’t bond properly over debris—think of it like painting over dust.
Next, choose the correct sealer. Most polyurethane-coated tents require a urethane-based seam sealer. Silicone-treated fabrics (commonly called silnylon) need a silicone-based formula. Check your tent’s specs—using the wrong product is like putting diesel in a gasoline engine (it won’t end well).
For application, pitch the tent taut or lay the rainfly flat. Apply a thin, even bead directly onto the seams on the inside of the rainfly. Then, use the included brush to work sealant into stitch holes and folds. Allow 12–24 hours to cure fully before packing.
Some campers argue modern factory taping makes sealing unnecessary. However, temperature swings, UV exposure, and abrasion degrade tape over time. Pro tip: test seams with a hose before big trips. Mastering these tent waterproofing methods ensures you stay dry—because nobody wants a soggy sequel to their wilderness adventure.
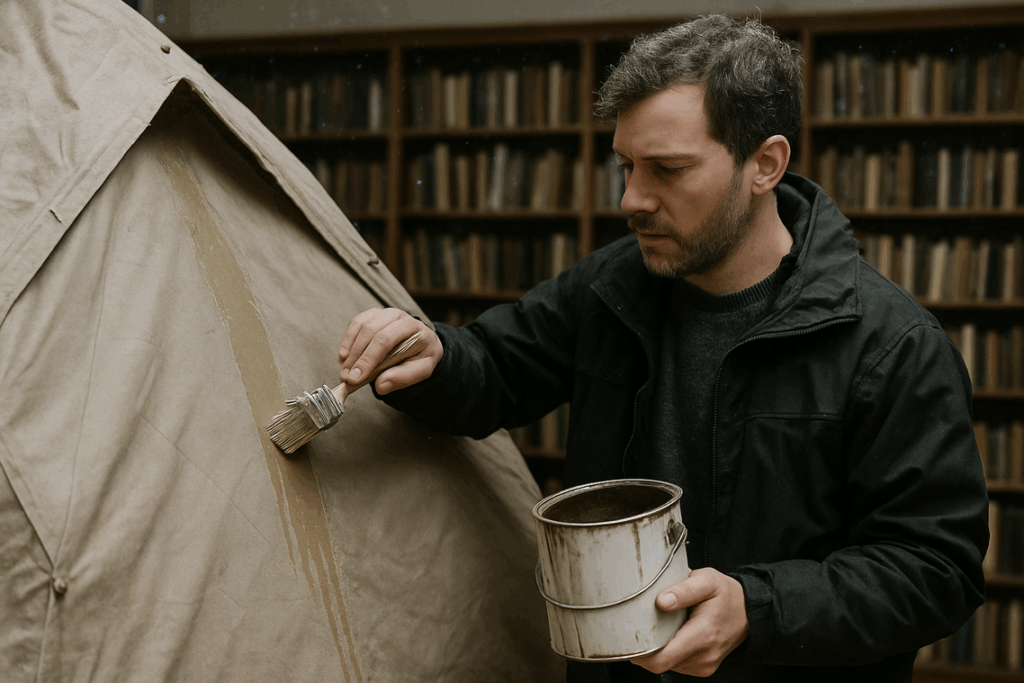
Restoring the Barrier: Re-Coating the Rainfly and Floor
Eventually, every well-loved tent hits this stage. If your rainfly or floor feels sticky, flakes like old paint, or smells oddly sour, the polyurethane (PU) coating—the waterproof layer bonded to the fabric—has broken down. At that point, re-coating isn’t optional; it’s essential.
First, confirm the issue with a simple spray test. Lightly mist the rainfly with water. If the fabric “wets out” (absorbs water instead of beading it), even after refreshing the DWR (durable water repellent), the underlying barrier has failed. In other words, it’s time to act.
Here’s what I recommend. Start by scrubbing away the deteriorated coating using a sponge and isopropyl alcohol. Remove every loose, flaking patch—new sealant adheres best to a clean surface. Once fully dry, lay the fabric flat and apply a thin, even layer of tent sealant like Tent Sure using a foam brush or squeegee. Two thin coats are better than one thick coat (patience pays off here). Let it cure completely before packing.
For broader gear care guidance, review caring for outdoor clothing washing and reproofing explained.
Among effective tent waterproofing methods, careful surface prep and thin applications deliver the longest-lasting results.
The Outer Shield: Refreshing the Durable Water Repellent (DWR) Finish
First, let’s clarify what DWR actually is. Durable Water Repellent (DWR) is a protective coating applied to the exterior of your tent fabric. It causes water to bead up and roll off instead of soaking in. While it’s not the main waterproof barrier (that’s usually a polyurethane or silicone coating underneath), it’s essential for breathability and overall performance. Think of it as your tent’s rain jacket.
So how do you know it’s failed? If rain stops beading and instead darkens the fabric, making it feel heavy, your tent is “wetting out.” At that point, airflow drops and condensation increases.
After cleaning, follow these steps:
- Spray a DWR treatment evenly across the rainfly.
- Use a light, consistent coat (a little goes a long way).
- Wipe excess drips with a damp cloth.
- Let it air dry completely.
Some products require low heat to activate, so always double-check instructions. Among tent waterproofing methods, refreshing DWR is one of the simplest and most effective.
Ensuring Longevity: Proper Care and Storage
Wet storage vs. dry storage: one breeds mildew, the other preserves performance. Never store tent damp. Instead, air it out at home.
Pack it dry, then store it loose in a breathable sack, not a stuff sack. Pro tip: review tent waterproofing methods annually.
Your Weather-Ready Shelter for Any Horizon
You set out to make sure a surprise storm never ruins your adventure again—and now you have the plan to do exactly that. By taking the time to clean, inspect, seal, and re-coat, you’ve eliminated the weak spots that cause frustrating leaks.
A dripping shelter can cut a trip short, but with consistent care and the right tent waterproofing methods, it’s a completely preventable problem. You now have the skills to protect your gear and your peace of mind.
Don’t wait for dark clouds to test your setup. Gather your supplies, waterproof your tent today, and head into your next trek confident, dry, and ready for anything.